Sunday, December 11, 2005

Pants done!

Dec. 11
They’re done! I am too fat to show off the tops of the pants in a photo but here I am walking Rockwell while wearing them. (I also made the fake fur headband too, but some time ago.) Mum made the mitts (thanks Mum!). And I wore them shopping afterwards and only got a couple of funny looks. :) I must say, they are comfortable and they fit fine. On to the next project, whatever it turns out to be.
It's the pants

Thursday, December 08, 2005

skirt finished, pants done to the belt loops

Zooming ahead, I want to get these pants and skirt DONE. I have bottle bags to make for Christmas and maybe a few fleece things, never mind my next “real project”, and as usual, I get impatient soon after I start a project and this one is more than due to be done.

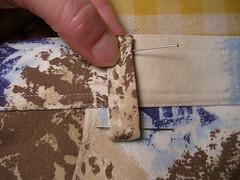
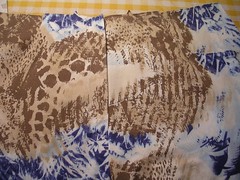
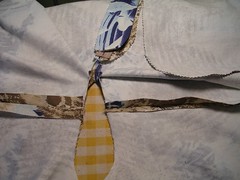
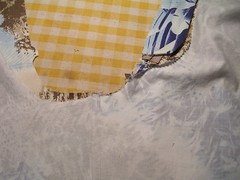
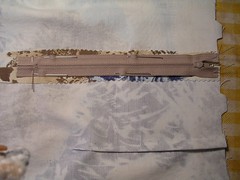
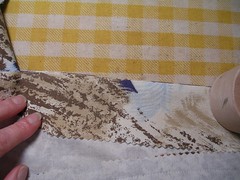
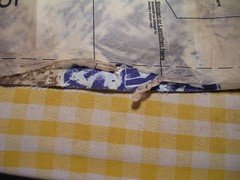
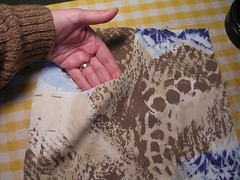
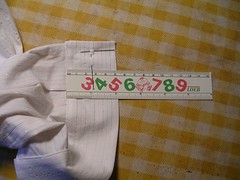
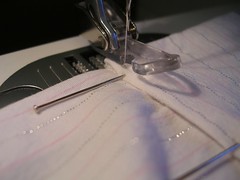
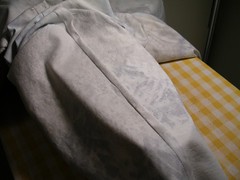
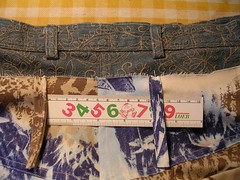
I decided to fell the side seams one way, instead of doing the modified flat fell. In fact, if you look at a pair of jeans you have, you will probably find that the side seams are serged. Can you imagine! Anyway, I am felling mine but only with one line of stitching. These pants are made with wacky, cheap fabric and I am not going to waste time, thread and patience doing two lines of stitching. I am falling the seam toward the back and it gets a little tricky at the pocket area. I have a photo showing how I am trimming the seam allowances away at that point. The front of the pants is at the top of the photo. That front part of the seam allowance will be folded over the back, cut-away part. Because there are four layers of fabric at the pocket on the side seam, you have to trim them away strategically to reduce bulk. Make sure you leave enough of the seam allowance to successfully fold it over the trimmed part.
28 side seam fell
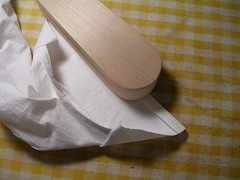
Once you have trimmed it, you need to iron over the fold. Use a sleeve board for this manoeuver. (I like the spelling with the “o” in it.) I start at the bottom of the leg and move up, unwrinkling the leg as I go. Use the clapper to get that good, solid crease so you don’t have to use pins. Pins will only end up jabbing you at some point and if you can avoid that, I would.
29 side seam ironed
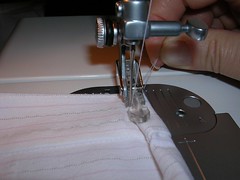
Once you have done all the prep work, turn the legs right side out. You will start sewing at the waist end and gradually sew down into the tube of the leg, ending at the bottom of the leg. This is slow going and you must be patient. You have to sew about two inches at a time, pausing - with the needle down in the fabric so it doesn’t move! - and making sure the fabric is not bunching up under the presser foot and that the folded over seam allowance is flat against the rest of the fabric.

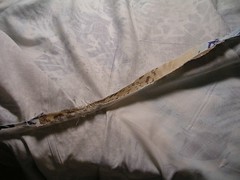
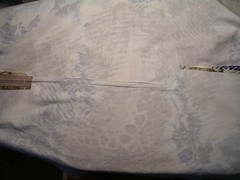
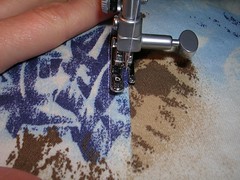
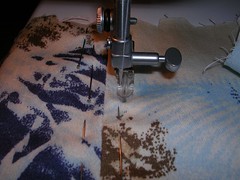
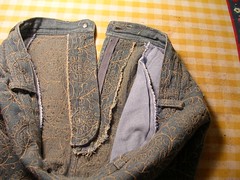
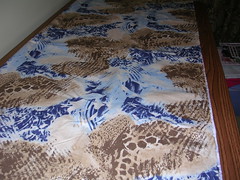
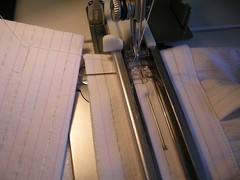
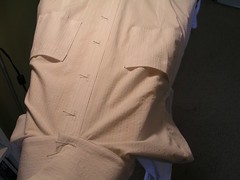
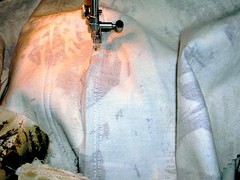
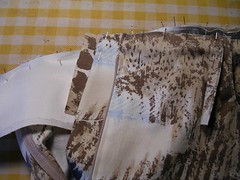
In the first photo, I am at the top of the pants and the back is on your left (you can see the stitching for the back pockets). You can see that the folded over seam allowance has come unfolded. Not to panic. As you sew slowly, you can tuck this back under before it gets to the presser foot and needle. (That extra line of stitching that you can see in the seam allowance is where I machine basted the pockets to the pants.)
30 side seam inside
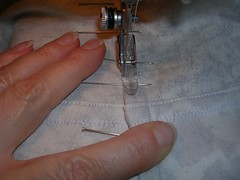
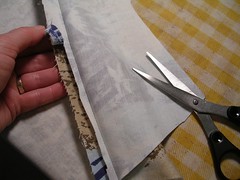
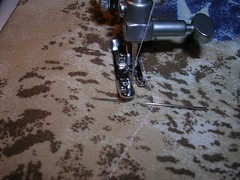
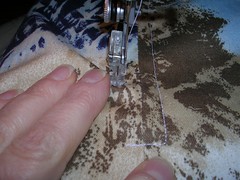
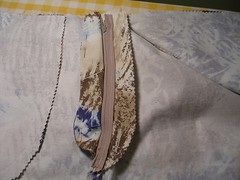
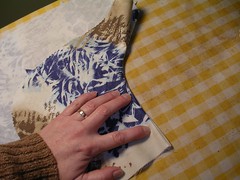
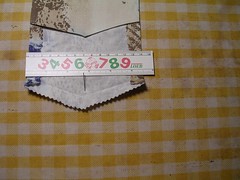
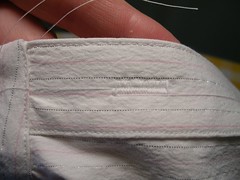
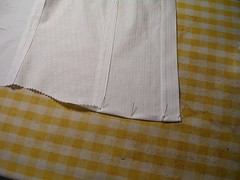
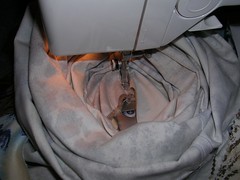
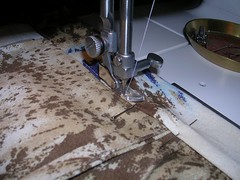
In the next photo, I have sewed all the way to the bottom of the pants leg and the leg is bunched up around the needle, forming a “well”. Because I am not doing a modified flat fell, I finish at this point and cut the threads.
31 side seam leg bottom
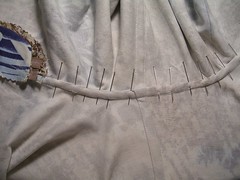
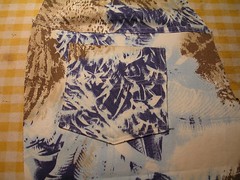
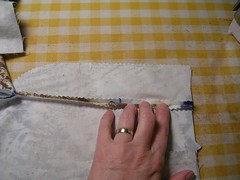
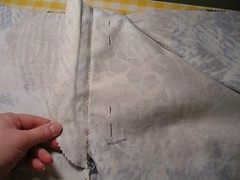
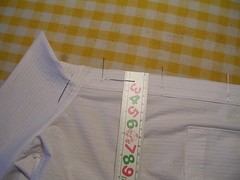
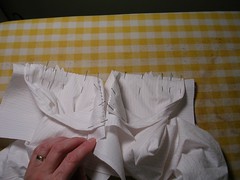
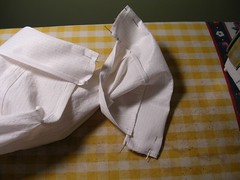
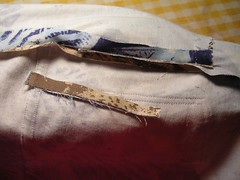
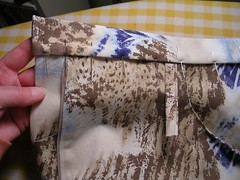
Okay, back to the skirt. I have sewed the facing on around the waist. After I pressed the seam allowance toward the facing, I “under stitched” it to the facing. This makes everything lie flatter, as well as it prevents the facing from rolling out toward the right side of the skirt. Now it needs to be tacked down. You can labour over this by hand or you can do it quickly by machine and it looks better and lasts longer. Fold the facing over to the inside of the skirt where it belongs and pin it to the seam allowances and darts. Fold the ends under against the zipper and pin them in place. In the next photo, I have pinned everything on the wrong side of the skirt. I will then turn the skirt over and replace the pins from the right side because I am going to sew on the right side where it will show.
32 skirt facing
Before sewing, make sure that the upper back edges match at the zipper. You have folded under the facing at the zipper but you should make sure that when you do the zipper up, the top edges line up. This is a very easy thing to adjust at this point.

Now, sew the facing down onto the skirt, using the machine. Sew into the seam line and the dart line, which will tack the facing down at six points. At the back, sew down the line of stitching used to put the zipper in.
33 skirt zipper
Once you have finished this, all you need to do is fold up the hem about a quarter of an inch and press it, then fold it up one more time and press it (thus folding in the raw edge). Sew the hem using a zipper foot and the skirt is DONE!

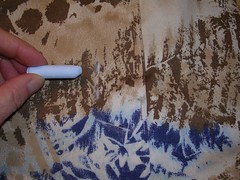
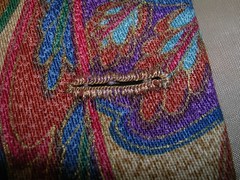
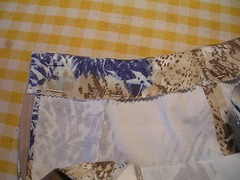
Back to the pants. We’re going to put the waistband on so that no hand sewing is involved. To do this, you have to sew it on to the wrong side (the inside) of the pants first. And before you do that, you should position the belt loops so they get sewed on nice and firmly. I have used a pair of pants I made before for the loop placement but you can use any pant that you like where the loops are. I also positioned the loops so that when they are turned up and put in their proper position, the folded edge will be seen first on the outside (where people might glance at the loops). Have a look at the photo. The two belt loops at the back are a good example. The fold is placed to the outside of the centre line and the line of stitching that makes the belt loop is placed on the inside. As well, the edges of the belt loop come together under the stitching line and one edge is slightly inside the other, allowing you to see both edges. I put that side on what will be the inside of the belt loop so you won’t see it either. It’s the little things that can make a difference (even on wacky pants)!
34 belt loops
In the next photo, I have pinned the right side of the waistband to the wrong side of the top of the pants. I have left a seam allowance of 5/8 inch at either end to make the ends square.
35 waistband
In the next photo, I have sewn the waistband to the pants and sewn the ends square and turned them right side out. I have also ironed under the long raw edge and trimmed it and then pinned that folded edge over the line of stitching on the right side of the pants.
36 waistband
Next, I will sew down the fold using a zipper foot, sewing over the belt loops for a second time.
37 waistband
Finally, I am finishing the belt loops. To do this, you have to tack them down at the bottom of the loop, onto the pants body. To gauge where to do this, fold over the top end and then fold up the loop into its final place (it’s a little more than a quarter inch down). Stick a pin in where the loop folds naturally at the bottom. This is below the bottom edge of the waistband to allow for wider belts to be used. Sew this part of the loop first. Now fold the loop up and tuck in the raw upper end and sew it to the waistband at the top edge. I go back and forth a few times to make sure it is tacked on firmly.
38 belt loop

Wednesday, November 30, 2005

more seams

Yesterday, I heard Rocky upstairs and then silence, which usually means he’s up to something. I went up and there were the partially completed pants, lying in the hallway. He has pulled them off the ironing board and gone for a little run with them. I put them back and it’s not until later, when I go to continue sewing, that I notice what he has done. Rocky has chewed the crotch. In doing so, threads have been pulled and the fabric is puckered. Grr. I try to smooth the threads back into place but with the Lycra in the fabric, it doesn’t really work. I iron the heck out of it and it ends up being “good enough”. Now I have to see if I can fold one half of the seam allowance over to make a proper flat fell, with the unravelled edge he chewed. And it turns out I can.
26 pants crotch wrecked
First of all, I iron the seam open all the way around the crotch, to flatten it. Then I iron it over to one side on the outside. I fold the seam over to the side that has the topstitching on the fly front - it’s the right side in this case. I just checked the front of the purchased pair of pants I am currently wearing and on them, the fly top stitching is on the left! So you never know. I iron the fell as much as I can on the back of the pants where the seam is straight. When it gets to curve too much, I simply fold the seam allowance over and tuck it in with my fingers, putting pins in perpendicularly as I go. I put the pins in this way because it is easier to hold the fold down and I can get a lot of pins in and I can sew right over them if need be.
27 seam pinned
In the next photo, I am sewing the fell on the wrong side (the inside of the pants) using a zipper foot to get close to the folded edge. If you are going to sew over the pins (instead of taking them out as you go), go slowly or you risk hitting the pin with the needle, which can put a burr on it (making it useless) or breaking it altogether. I am at the part where the yokes meet the pants-back and there will be a substantial lump of folded fabric to sew over. Using your hand, turn the fly wheel on your machine and “walk” the presser foot and needle over the lump if it doesn’t want to go by itself. I am also using my right hand (which is holding the camera so you can’t tell) to gently pull the fabric away from the sewing line, so that it doesn’t get bunched up under the line of stitching.
28 seam sewed
After this seam, I pinned the side seams and sewed them both. At this point, before sewing the side seams, you can pin the pants on and see if you need to adjust the width of the side seam allowances. I have made these pants before and I haven’t lost any weight recently so I know I don’t need to adjust anything (famous last words). I also sewed the facing on the skirt while I was at it.

Monday, November 28, 2005

pants and skirt back, side seams

The next photo shows what the front of the pants looks like, after the zipper has been sewed in and the fly finished. If you go to the large photo, you can see that the double line of topstitching around the fly slopes in a little near the bottom. This was necessary to catch the zipper tape on the inside. If the fabric were plain and the stitching would show more, I’d be annoyed, but you can hardly tell with this fabric.
19 fly front
Next, I finished the back seam of the skirt. The zipper requires the seam allowance to be spread out so I pinked those edges. Below the zipper, I made a flat fell in the direction of the vent at the bottom. After this, I sewed first one side of the skirt and did a modified fell and then I sewed the second side and finished it the same way. I did the modified fell (like the inside seam on the sleeve of the shirt) because I knew on the second side, I would be sewing inside a tube (like the sleeve). Of course, the skirt is a much bigger tube but I thought I would do this finish anyway.
20 skirt back seam
Next, I put the backs together. First you have to sew on the yoke at the top of each back piece. This is the first place on the pants so far that I will be doing a proper flat fell. The photo shows the yoke sewed on and the fell started.
21 back yoke
The next photo shows one side of the back as finished. You can see I have added a second line of stitching to the flat fell on the yoke. I do the first line (the stitching that holds down the seam allowance) on the inside, to sew down the seam allowance after I fold it over the raw edge. I sew the second line on the right side (outside), close to the seam line. The photo also shows the pockets after they have been sewed on with two lines of stitching. I pinned them carefully in place and then used a zipper foot to get the outside line of stitching nice and close to the edge of the pocket.
22 back finish
The two front pieces of the pants have been sewed together at the fly and there is a little line of stitching that goes down toward the crotch. The back halves are still two separate pieces. Following the pattern instructions, I sew the fronts to the back at the inside leg seam. The next photo shows the inside leg seams sewed and on the right hand one, I have started to trim one half of the seam allowance in preparation for making a flat fell. I am making a proper flat fell, like I did on the yoke, with two lines of top stitching. I am also falling the seam over toward the back of the pants (as opposed to folding it so it is stitched on the pants front).
23 pants pieces
As before, you can iron down the seam in preparation for a flat fell and you don’t need to pin it in place if you use a clapper to really crease and flatten the folded seam allowance. Once you have ironed the seam allowance out, and then folded it over and pressed it again, you are ready to sew. Sew the flat fell down on the inside of the leg, on the wrong side of the fabric. Then turn the pants over and sew the second line of stitching close to the seam line on the outside.
24 flat fell
The last photo today shows the pants pieces getting lined up at the crotch. You can see the front two pieces joined at the fly and the back two pieces are still separate. Line up the raw edges and match the notches and pin the pants together at the crotch. Organize it so that you will start sewing at the back and end up at the little line of stitching on the front. It is easier to aim your seam at the stitching already there and finish at it, than to start with the bulk of the fly behind and maybe under your presser foot and proceed from there toward the back top edge of the pants. After this, we will trim this seam and make it into a proper flat fell too, even with the curve in it.
25 pants crotch

Saturday, November 26, 2005

skirt zipper, pants fly

Today I decided I’d better keep sewing because when I went upstairs to see why Rocky was so quiet, I discovered him sucking on the skirt facing I’d made and left hanging on the back of the chair. He doesn’t chew things (yet) so the facing was just wet and slimy. I rinsed it out and ironed it dry and all was well again.

I started by topstitching the back pockets. I made the first line of stitching on the wrong side, stitching close to the folded edge of the “facing” (the turned over “v” shaped part). Then I turned the pocket right side up and stitched close to the first line of stitching. I didn’t use the zipper foot but I could just as easily have used it. I also put a pin in the point of the “v” so that on the second line of stitching, I would know exactly where to turn so that the two lines would match at the point.
9 back pocket topstitching
Then I put the zipper in the skirt. I rarely baste zippers in first, unless the fabric is fussy and unforgiving. First I pin the zipper to the opened seam allowance from the wrong side. This lets me line it up accurately between the seam allowances and the top of the skirt.
10 skirt zip inside
I flip the skirt over to the right side and put pins in to secure the zipper because I am going to sew it from the right side.
11 skirt zip pinned
Notice that the pins are pointing the same way up both sides of the zipper. I will be sewing from the top of the zipper to the bottom on both sides. This necessitates switching the zipper foot from one side to the other but I think you get a better finish this way than if you sew down one side and up the other all at once. Sew down the one side and then across the bottom.
12 skirt zip first side
Now start again on the other side at the top and sew down to the bottom. This time, you will notice that the fabric starts to pile up a little and you are going to have to finesse this by holding the fabric down with your left hand and sewing slowly while smoothing the fabric out as it goes under the presser foot. When you get near the bottom of the zipper, you will have to carefully smooth out that little bump otherwise you will get a fold of fabric like a pleat at the bottom. Then turn and sew across the bottom again.
13 skirt zip second side
The fly is a complicated thing so if you’re going to make it, you have to follow the pattern instructions. Here are a few tips to help along the way. Any time you have to turn fabric right side out along a seam and make it flat, first press the seam open.
14 fly facing pressed open
This works even if you are turning the fabric right side out, along the seam line. If you press open the seam allowance first, it flattens the fabric along the stitching. Then, when you fold it along the stitching right side out and press it flat again, it will be even flatter than if you didn’t do this. Now this part of the fly is ready for topstitching.
15 fly facing press
On the next photo, you see the fly as mostly constructed, from the inside of the pants. I have pinned back the fly on the left so it doesn’t get caught in the stitching on the right. There are chalk markings for where to topstitch the fly but they are on the wrong side of the fabric and they are under the fly facing on the right side as you look at the photo.
16 fly inside
In the next photo, I have folded up the fly facing and put pins in where the chalk markings are. When you turn the pants front right side up, you will be able to see where the markings are because the pins will show through to the right side.
17 fly marking
On the right side of the pants front, you can now mark the stitching line with chalk based on the pins you put in on the other side. This way, the chalk will be fresh and in the correct position. If you marked the stitching lines at the very beginning when you cut out the fabric, not only would they be worn off with handling but they might not follow exactly where you have to stitch, based on where the zipper ended up. Sewing is certainly not an exact science and things move around as you go on. In fact, once you mark the stitching line on the outside in chalk, you are going to have to put things together the way the pattern instructions tell you and you may find (as I did) that you have to move the stitching line over a little bit to ensure that you catch the zipper with the second line of topstitching. If you have a pair of purchased pants to use as a rough guide, you will see how the fly needs to look when it is completed and you can use that to help decide exactly where to stitch.
18 fly outside

Thursday, November 24, 2005

starting to sew, pockets

I didn’t take any pictures of cutting the pattern out, but I managed to get a skirt out of what was left after cutting the pants out. I will be sewing them both at the same time. I’ve made the pants twice before but the skirt I have made in various lengths at least 10 times.

It took a while between cutting and starting to sew and the photo following shows what happens when you leave a piece hanging from the chair with the pattern still pinned to it and don’t keep the door closed with a nosy puppy about.
3 chewed pattern
Before I get sewing, I like to have a look at pants I’ve made before so I know where I’m going. I also like to know where I should finish raw edges on things I don’t often make, like the fly.
4 inside pants
So now I’ve marked all the pieces, dots, darts, where the zipper goes. I’ve also ironed on the interfacing - in this case, it only goes on the waistband of the pants and the facings on the skirt. As I remarked on the shirt part of the blog, I like to pin as many things together as possible and line them all up to start sewing. I don’t know if it is, but it feels more efficient that way. Once I’ve sewed everything I can, then I iron all the pieces at one time too. In this photo, I’ve pinned the skirt facings, the fly, pants pocket facings and skirt darts (I think).
5 sewing line up
When I fold the pocket facing over to the right side, I like to make sure I see the seam line a little on the inside of the pocket before I iron it flat. Then when I top stitch the edge of the pocket, I know none of the facing will be showing on the outside.
6 pocket facing
Continuing with the pockets, I stitch the pocket itself to the pocket facing along the raw edge that I’ve pinked to keep from raveling. When you lie the pocket flat on top of the facing (which is attached to the pants front), you will see that the side seam allowances do not match up. That misalignment will allow the pocket to curve out from the body when it is finished. Once the bottom of the pocket is sewed, turn the pieces right side up and smooth everything nice and flat on the ironing board. Then, move the side seam allowance edges so they line up and pin them all together (there are three layers - the pocket, facing and pant front). The photo shows how there is more fabric on the pants front than on the pocket. Baste the pinned edges together.
7 pocket
I am making things out of the order in which they are presented on the pattern instructions, mostly because I can because I have experience and because of my penchant for efficiencies. I show the back pockets next because they are easy to make and set aside until they are needed and you can do that mass ironing that I mentioned.

I have sewed down the raw upper edge (even though it gets sewed down again when finishing the pocket) because then I don’t have to worry about it becoming unfolded. I have turned the pocket right side out and ironed down the side edges. Now I have to make the point in the middle of the bottom edge. I iron one slanted edge and then open it out and iron the other edge. To make sure the point ends up in the middle, I use a ruler. Fold up the ironed edges and tuck the excess fabric in the point gently to one side or the other or fan it out so it doesn’t make a bulky point.
8 back pocket

Saturday, November 19, 2005

Jeans

For my next project, I have decided on pants - or trousers for the English readers. Jeans if you will. I had this length (about 3 meters as I recall) of medium weight cotton with a hint of Lycra fabric that I got on sale for an incredibly cheap price - hence the odd-looking print on it.
2 Fabric laid out
I have made this pattern twice before too, so it is already adjusted. Except I forgot to mark on it if I needed to lengthen the leg at all. Silly me because although I am only 5’ 2” tall, I never get the petite pants because all my height is in my legs. Anyway, I remembered at the last second, as I was cutting out the pieces and I added about 1/2 inch to the leg. Hopefully, it will turn out that I didn’t need to add anything.
1 Pants pattern
The pattern is nice to work with and seems to fit me well. I decided this time to not put the little coin pocket on the front right pocket and to just use the fabric as pocket facings instead of finding some old pieces of broadcloth as I did for the other two pairs of pants I made with this pattern. The print is so busy on the fabric that you wouldn’t really notice any detail. I know I should just make a few things out of really nice fabric but I am lured by the cheap stuff, I can’t help it.
I am hoping they won’t look too hideous but even if they do, I can still wear them around the house as comfy, slightly stretchy pants for the winter. And with that blue AND brown in the print, they’ll go with everything! :) Mostly, it’s a good pattern for making flat fell seam finishes, even if they don’t indicate this at all on the instructions that come with the pattern. If you get the pattern (McCall’s 9233) and decide to sew along with me, it will be a thorough exercise in flat felling.

Thursday, November 10, 2005

buttonholes and you're done

In deciding where to place the buttonholes, try on another shirt that doesn’t gape at the widest part of your chest. You will see that there is a button right at the widest part. If there isn’t a button there, the shirt will pull open at that point and you will never be happy with it. On a looser shirt, it doesn’t matter so much but this shirt fits quite closely so you need to be sure that a button is going to be at this main “stress point” along the front.
46 button placement
Mark this critical point on the front band and then start measuring up and down the front from there, to determine where the other buttons will go. If the buttons are too far apart, the front will also gape. On this shirt pattern, I place the buttons three inches apart. On a looser shirt, I may go up to three and a half inches apart. On Peter’s shirts, I place the buttons about three and a half inches apart. You have to get a little experience before you get comfortable with this process. If in doubt, place buttons closer together rather than farther apart. Obviously, I like them closer together.

I have made this shirt before so I place the right side of the front of the shirt on the ironing board and use an existing shirt in the same pattern as a template. Another thing to note is that many women’s home made shirts or blouses tend to have the buttonholes sewed horizontally, so that the buttons do not come undone easily. I often do make horizontal buttonholes but on this pattern, because it has front bands that are quite narrow, horizontal buttonholes wouldn’t work. Also, since it is a fairly “tailored” looking shirt, I want it to look more like a purchased man’s shirt than a home made blouse, so I make vertical buttonholes.

Once in a while, glance down and ensure that your sewing helper is being good.
47 dog helper
Don’t forget to mark the buttonholes on the cuffs as well and don’t make the mistake of making them fit too tightly. Put the buttonhole close to the one edge and you can always move the button on the other edge to make the cuffs tighter if you want.
48 button cuff
I use a Singer sewing machine that has an automatic buttonholer. It works pretty well although it does NOT like bulky fabric and will skip stitches under those circumstances. Even on something like this shirt, it skips stitches at the neck where there are layers of fabric. I trimmed down all the seams but they still hold the buttonhole attachment up too far and it doesn’t like that. I have learned to press down on the attachment as I am sewing with it but even that is not foolproof.

I like to start with one buttonhole and then, without clipping threads in between, move from one to the next until they are all done, including the cuffs. If you don’t clip the threads in between making buttonholes, the tension is maintained on the thread and you don’t have to worry about loose ends getting sucked into the bobbin (as is one of the banes of my existence).
49 button cuff
In the next photo, you can see where the stitches skipped on the topmost buttonhole I made after doing the collar. I didn’t lean on the attachment as much as I should have and now I will have to fix this with some hand sewing. (In fact, when I cut the holes open, I did a terrible job and clipped threads all over the place and now I have an entire evening’s worth of hand sewing to do.)
50 buttonhole
Before I got this machine, I made buttonholes by hand. To do a nice job (especially on a small, lightweight buttonhole) you really have to be patient and picky. The next photo is a buttonhole I made on a vest, to show how that works. Not flawless but pretty good.
51 bh hand sewed
Once you have the buttonholes made and cut open, lay the shirt on the ironing board and line up the two fronts and, using the buttonholes as a guide, mark where the buttons will go.
52 bh lined up
Now you can sew on the buttons while watching tv and your shirt will be finished!

Sunday, November 06, 2005

cuffs and hem

I make the cuffs in the same manner as the collar, by attaching them first to the WRONG side of the sleeve and then sewing the folded edge over the stitching line on the RIGHT side, so you don’t have to do any hand sewing. At this stage, no matter what your fabric is, it is easy to tell the right and wrong side because you have sewn the sleeves into tubes and the cuff has interfacing on the wrong side. Following the instructions on your pattern sheet regarding the pleats and such, pin the wrong side of the sleeve to the right side of the cuff. I show both cuffs so pinned here.
40cuffs pinned
Sew the cuffs to the sleeves. Trim the seam allowances to about 1/4 inch. You won’t want any bulky fabric inside the cuff once it is finished, when you go to sew the buttonholes.

Press the seam allowances toward the cuff. Now press the other side of the cuff making a folded edge that will get sewed over the stitching line in a minute. This photo shows the clapper in “action”. I have pressed the seam allowance over and am using the clapper to make a sharp edge. Trim the seam allowance of the other pressed edge.
41cuff press
Now fold the ends of the cuff, right sides together and pin them in place. You want to line up the folded edge so it will just cover the line of stitching. I show the cuffs from the inside and the outside in the next photo.
42cuff ends pinned
Stitch the ends of the cuffs and trim the seams again, making sure you get closer to the stitching line on the corners so that you don’t get bulky fabric on the inside. This way, you get nice flat corners too.

Turn the cuffs right side out and use your point turner to poke out the corners nice and sharp. I find I don’t need to press the little side seams on the cuffs at this point, before stitching down the folded edge. They can be pressed successfully after stitching.

Now carefully pin the folded edge of the cuff “facing” over the stitching line. Change your presser foot to the zipper foot so you can get close to the edge as you sew. Stitch down the edge over the previous stitching line. Cuffs are done!
43cuff outside

I decided to do the hem next because I was running out of bobbin thread and I hate to have it run out in the middle of buttonholes, especially because I have an automatic buttonholer attachment on my machine. If it runs out in the middle of a buttonhole, you have to fill the bobbin and then get a scrap of fabric and finish the interrupted buttonhole before you can start over. A pain.

I make a narrow folded hem on shirts (and other things) and I use the machine to sew it. For the purposes of this blog, I decided to pin the hem to the ironing board cover to hold it in place and show what I’m writing about. I have now discovered an easier way of making hems! You can carefully slide the iron over the pins (which are put in at an angle) and then remove the pins as you press the fabric flat. Press up about 1/4 inch of fabric (or as little as you can get away with) all along the hem. Trim bits that protrude past the 1/4 inch, like where the seams and darts are. Then press up 1/4 inch again, making a double fold, tucking the raw edge inside the fold. If you press properly and use the clapper, you shouldn’t need to pin the hem down before sewing it.
44hem pinned
Using the zipper foot again, sew down the hem. In the photo, I am pulling on the thread tails as I start the hem, to help feed the fabric through the machine.
45hem sewed
Especially because it is thick at the bottoms of the front bands, it can be a little hard to get the shirt to feed evenly when you start sewing the hem. Gently but firmly pulling on the thread tails helps. Now you are almost done the shirt!