So we’ll start with the shoulder seams. The pattern instructions call for making the front and back of the bodice separately. Since they are lined, you have to leave them open at the shoulders and then sew the fabric pieces together first and them sew the lining gap together. They suggest that I sew the lining pieces by hand but again, I have chosen to sew them by machine. As you will see, this doesn’t always work out perfectly but it wasn’t so bad that it isn’t acceptable.
First, I pinned the shoulder pieces together. I have pinned the lining down out of the way so it won’t get caught when I sew the first part of the shoulder seam. I also lined up the edges so I would sew right across where the lining leaves off.
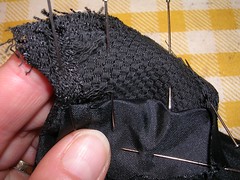
Once I sewed the seam, I trimmed the edges and ironed that part of the seam open and flat. Then I started tucking the lining seam allowances in. First I pushed one side of the lining shoulder seam under the other side. Then I folded the other side and laid it on top of the tucked-under side.
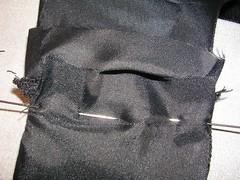
Once I’d made the fold and tucked in all the loose ends, I pinned the folded edge down in preparation for sewing. I sewed from the RIGHT side, in the ditch of the seam. When I turned the shoulder over to look at the wrong side (the lining side) I discovered that I had NOT caught the folded edge in the sewing. This meant that I would have to sew a second line of stitching from the wrong side, to make sure the lining was sewed down securely.
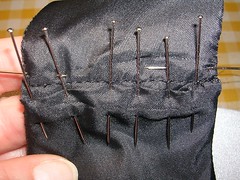
When I sewed the second line of stitching, I made sure it was parallel to the first line so it would look like a “detail” and not like I’d made a mistake. In the next photo, I have one shoulder right side up and the other lining side up and you can see the parallel lines of stitching (you might have to view the larger photo at Flickr to really get the detail). Once I press the heck out of this, it will look just fine.

Now that the bodice is done, I started on the skirt. It is very simple - a tube with pleats and side seam pockets. First I sewed the pocket pieces to the side seams where indicated. Then I sewed the side seams, skipping the pocket opening of course. The pattern instructions call for sewing around the pocket edge but I wanted to do a modified flat fell on the side seam to finish it first. I pressed open the side seam allowance and then pressed under each side, to make the flat fell.
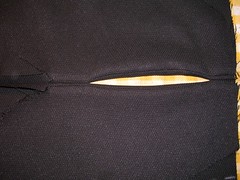
When I sewed down the flat fell on each side of the seam, I stopped tucking under the seam allowance at the pocket and just sewed the raw seam allowance down. The extra line of sewing will help keep the seam allowance from raveling where the pocket is placed but it won’t encase the raw edges like the fell does. But I couldn’t figure out how to continue the fell under the pocket so I just sewed the seam allowance edge down. If I’d sewed the pocket itself down, thus encasing the raw edge, it wouldn’t have allowed the pocket to hang freely on the side and the end result would have been an obvious opening on the side, instead of a hidden opening for the pocket. So I will have a little bit of the raw seam allowance hiding under the pocket but I can live with that.

No comments:
Post a Comment