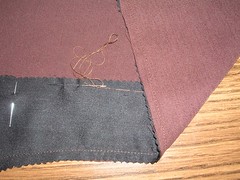
Today, I started by basting the interfacing down the fold line on the jacket fronts. I decided to baste by hand, using matching thread and taking a tiny stitch every half inch or so. In this way, I won’t have to remove the basting and it will anchor the interfacing throughout the life of the garment. I was concerned that the top stitching might not catch the edge of the interfacing once it was folded inside and this extra step reassures me that it will stay put.
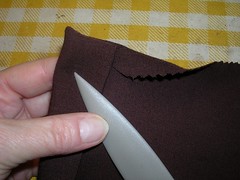
Next, I turned the pockets right side out. I am showing the plastic point turner I use but of course, you push it into the corner on the inside, to make sure it is nice and square. I pressed the pocket edges in on all sides and used the clapper so I would get a nice sharp edge.
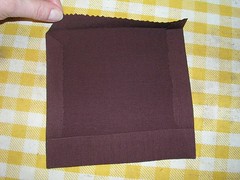
After I ironed all the raw edges over, I pulled the bottom corners out and made a mitered corner. I am not finishing the raw edges. I used to do this and all it achieved was a bit of bulky stitching that showed on the right side. If you look inside the unlined pockets on most purchased garments, the raw edges are not finished either.
Finally, I put the zipper in the skirt. After pressing open the basted seam allowances, I first zigzag finish the raw edges of the seam allowances to just below where the zipper will go. I plan to flat fell all the seams but the raw edges will stay exposed (on the inside) where the zipper is and I don’t want them fraying when I wash the skirt later.
Next, I lay the zipper on the wrong side of the fabric and pin it in place on the wrong side. Then I turn it over and put pins in on the right side. I place the pins as close to the outside edge of the zipper tape as I can so that when I sew, I can sew slightly inside the pins (between the pins and the basted seam). In the next photo, I am sewing down the right hand side of the zipper (as I look at it anyway) and you can see my sewing line is slightly to the left of the pins. I take each pin out as I come to it of course. And as I sew (slowly), I smooth the fabric up (back) and under the presser foot.
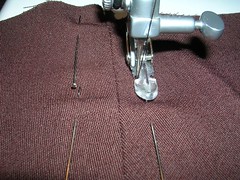
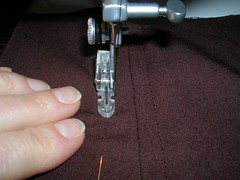
In the next photo, I am sewing down the other (left) side, starting at the top. I am sewing slightly inside the pin line and in this photo, if you click on it and get the big one at Flickr, you can see a small bump of fabric that has accumulated in the short distance between pins. This is the “excess” fabric that needs to be gently worked with your fingers, smoothing it back and under the presser foot so it doesn’t fold over and make a small and unwanted pleat.
After the zipper, I sewed the gores of the skirt together except for the seam on the right side (the zipper is on the left side). I have to flat fell them all (I plan a modified fell where I turn under each side of the seam allowance) and then I will attach the facings.
All the while I was sewing, Rockwell kept me company. If he was not looking out the window, he was lying quietly on the floor, watching me.

No comments:
Post a Comment