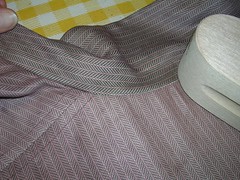
So we were putting on the collar and front facings last time. After I sewed on the facings, I pressed the seam open first and then closed again, to get the sharper, flatter edge. The next photo shows what the collar looks like from the outside, after I have pressed that part of it too.
On the inside, I have started to pin the collar facing to the neck edge. I have already trimmed the seam and ironed it up toward the collar. Now I am tucking the seam allowance under and pinning the facing to the shirt. I have a few pins in the middle and then I work my way to the shoulder seams.
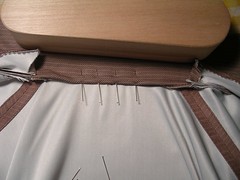
The next photo shows what happens at the shoulder seam. The front facings were sewed onto the shirt up the front, across the collar and up to the shoulder seam. Therefore, the collar facing only needs to be sewed down to the neck edge in between the shoulder seams. AT the shoulder, I tuck the raw edge of the front facing under and pin it down to the shoulder seam allowance on the inside. I put the zipper foot on the machine and carefully sew the facing down, turning 90 degrees at the shoulder and sewing down the front facing end there too. As for the pins, I can sew over the pins that are in at right angles to the line of stitching but I will remove the pin that is holding the front facing down because it runs along the line of stitching.
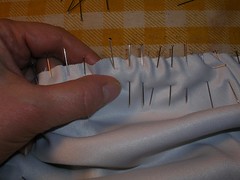
Next, the sleeves. As I’ve mentioned before, this is weird, slide-y fabric and when you put the right sides together, it moves around. As I was pinning the shoulder seam (I am doing this first and then I will sew the underarm-sleeve seam) I realized that I had to be even more picky about pinning.
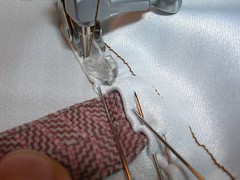
In the next photo, you can see I have put an anchor pin in on the right. It is stuck in at right angles to the other pins and goes into the ironing board cover and pad. It holds the shoulder seam so that I can work with both my hands putting in pins. I am also putting in pins about every 1/8 inch, gradually stretching the shirt body (the piece underneath) and working in the excess sleeve fabric so that I don’t end up with tucks when I sew. I am using my left thumb to slide the excess fabric over and put in a pin at that point.
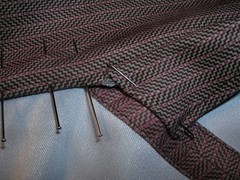
Once I had the sleeves pinned on, I sewed them to the shirt and then I ironed the seam allowances toward the shirt. Turning the shirt to the inside, I trimmed off the seam allowance belonging to the shirt and left the seam allowance belonging to the sleeve. I started to tuck the sleeve seam allowance under itself and over the shirt seam allowance, making a flat fell finish. This was tricky business because of the fabric. In the next photo, you can see I’ve successfully tucked the seam allowance under at the shoulder seam and halfway down the armhole but I have stuck pins in the ironing board to anchor the other slippery bits as I try to tuck them under.
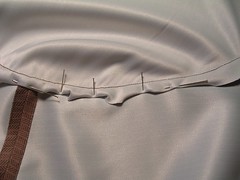
In the next photo, I have got all the bits tucked under, and with no folds either. It has been a struggle and I am not worrying about how uneven it looks, especially because this is on the inside.
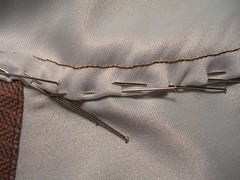
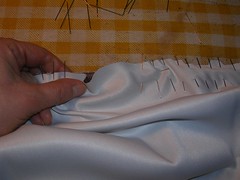
When sewing down the flat fell, I have used my right hand to take the photo but I am using both hands actively but gently to pull the fabric flat and away from the line of stitching as I go. I am also sewing very slowly and I have lots of time to guide the needle around the sharp end of the pins and pull the pins out as I get close to where they actually go through the fabric.
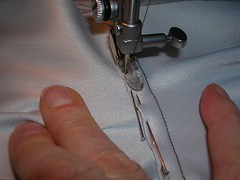
In the next photo, things are looking awfully bunched up and lumpy but it is surprising how the fabric straightens out as you get up to it. As I get to folds in the fabric, I put the needle down into the fabric (to anchor things) and raise the presser foot. With the presser foot raised, the fabric un-bunches and smoothes out. When I put it down again and continue sewing, I don’t end up with tucks.
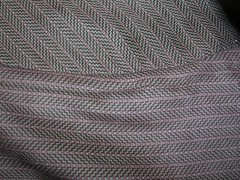
Finally, I turn the shirt over and you can see from the right side that it all ends up looking acceptable. A little wobbly perhaps, but I am betting nobody will really notice.
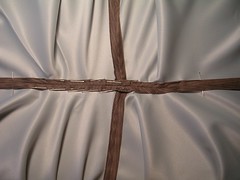
Getting back to the pants, I have already sewed the inside leg seams and done a modified flat fell on them. Next I am sewing the crotch seam. Here it is pinned together.
Having sewed the seam, I press it open and then press down the seam allowances in a modified flat fell. This is easy on the flat part of the front and back. In the curved crotch area, I pin the seam allowance down and remove the pins as I sew up to them.
No comments:
Post a Comment